Adriana, Home School, Projects

Summer Tie Dye Family Fun

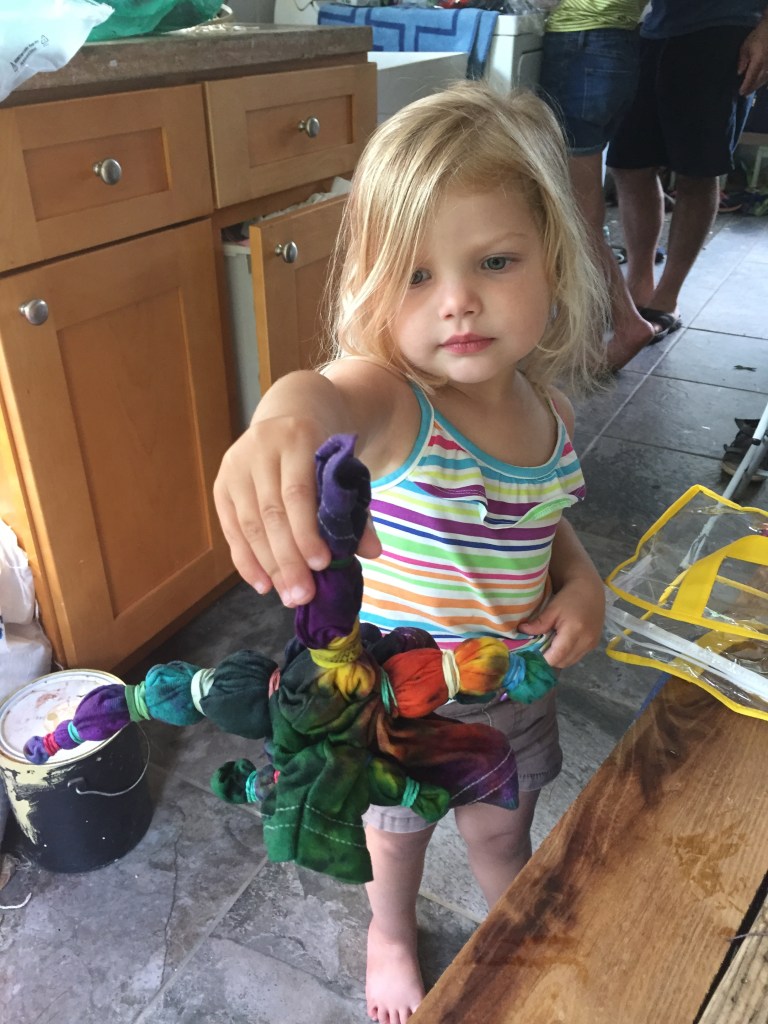
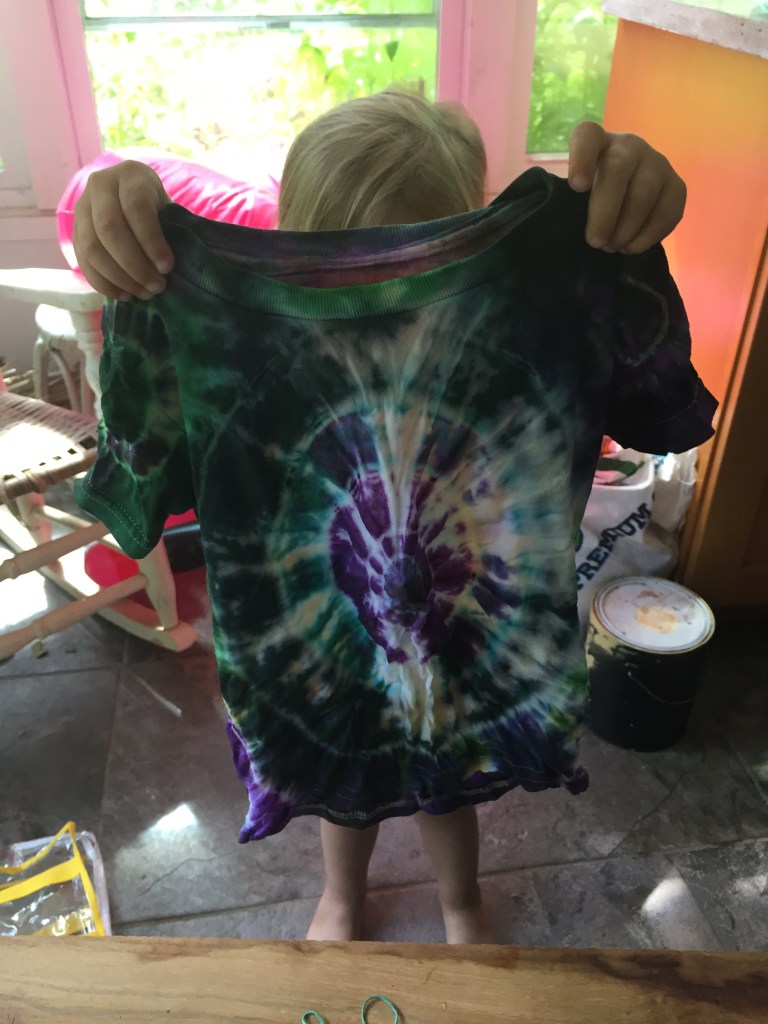
This is a summertime favorite at our house, turning anything old or new into a tie-dye creation! We aren’t professionals by any means and each time we tie-dye, we learn something new. There is definitely something so exciting about opening up your creation with anticipation and surprise. This year we watched a couple videos on YouTube to help us get a better spiral effect, which is what Leo (7) was really excited about creating. Lily (9) found a cool video on how to create a tie-dye effect that looks like rain falling. If you’ve never given tie-dying a try, here are some tips and videos to help inspire your tie-dying adventure!

Supplies:

  • Something made of cotton to tie-dye
  • Rit Dye
  • Plastic squeeze bottles to put your dye into
  • Rubber bands or string
  • a plastic bag to put your creation in once done to sit for a couple days

How To Steps:

  • First, slightly dampen your shirt (or whatever you choose to tie-dye), then tie up or fold it- we’ve included some links to video ideas for this below. My kids like creating bulls-eye patterns, spirals and an accordion pattern – sometimes they just drop the dye and tie up the shirt in a unique way and see what happens!
  • Next, put about a teaspoon or more of the Rit dye into your squeeze bottle, fill with water and give a little shake.
  • Then find a spot to work, I like putting a tray under the kids shirts to catch the excess liquid, and then squeeze your color onto your shirt.
  • Once finished, put your shirt into a plastic bag to sit for at least two days
  • After the two days, rinse your shirt in cold water, squeeze out and hang to dry
  • Remember not to wash your shirts with other clothes in the beginning because the dye may still run!

Have Fun!

Here’s a link for how to fold your t-shirts to create the spiral effect. We were very happy with how our spiral’s turned out! https://youtu.be/2UJkPKHvruk

This is also another great post on Artbarblog.com for how to fold shirts and tie-dye with Indigo.

If you’re looking to add a little history to your tie-dying fun, below is a clip that describes the 1,500-year-old Art of Chinese Tie-dying:

Hope you’re all Enjoying the last few weeks of Summer in a Special Way!

Adriana, Home School, Projects

All you Need is LOVE: Family Valentine Fun and Crafts

A Heart Sun-catcher by Lily

Valentine’s Day is such a special time of year to spread some love and cheer. It’s a time to celebrate love and friendship, to spend time together as a family crafting, baking, making Valentine’s, having tea parties and eating lot’s of chocolate! The kids and I have been busy making some holiday crafts and working on our Valentine’s, for each other, family and friends. This year more than ever, it’s extra special to send out some handmade Valentine’s to those who might need an extra reminder that they are not alone and are loved!

A favorite and simple craft for kids of all ages and one that is adaptable with the seasons and holidays is making sun-catchers for your windows. My kids love making these and never seem to run out of creative ideas for their festive sun-catchers. I particularly love seeing them light up our dining room like stained glass especially during the colder, darker winter months. All you need for this craft is some sturdy card-stock paper, contact paper, tissue paper and scissors.

Busy at work

Directions:

  • First have either you or your child cut out the frame design out of card-stock. For the one above we made a heart.
  • Next, cut out your contact paper so that it will overlap a bit on the frame of your card-stock. Then, peel the paper off the contact paper to reveal the sticky side and stick it to the frame.
  • Cut up the tissue paper and stick it to the sticky side of the contact paper. It’s as easy as that!

Another favorite in our house and a great way to introduce children to sewing is making hand-sewn felt hearts! Teaching your children to hand sew is one of the best skills you can give to them. It helps develop fine motor skills, builds self-confidence and patience. It also helps children practice communicating and following instructions along with encouraging them to use their imaginations and creativity. I have sat with all my children from an early age (2 or 3) and practiced hand sewing skills either with felt projects or lacing cards. It’s an activity that you can share in together with your child and as a family. We often gather round the dining table with our hand sewing supplies and listen to a good audio book or music and spend time crafting together. It is a calming and therapeutic activity.

Hand-sewn felt hearts

To make these felt hearts all you need is some felt, embroidery floss, fabric scissors, some stuffing (could be actually stuffing, or cut up old clothes) and a sewing needle.

Directions:

  • First have your child draw their design on the felt with chalk. Fold felt in half so that you can cut out two equal shapes at one time (the back and front of your project). Cut out design with fabric scissors.
  • Next, cut a medium-length strand of embroidery floss (not too long or the kids tend to knot or tangle). Layer your design one on top of the other and start sewing around the edges of the felt, leaving a 2-inch wide space open to fill with stuffing. If your child is young, you can help them push the needle through and pull it out always reminding them to pull the needle away from themselves.
  • After stuffing your design, then sew the gap closed. You can then run a string through the top to hang your stuffed creation. We made our Valentine Hearts and tied them to some yarn to hang together in the window as garland.
A Heart Jar

Like sun-catchers, another craft we love making for all seasons are jars decorated with tissue paper to put candles in and cozy up our home. This simple craft was made using a recycled jar, some tissue paper hearts and Elmer’s clear glue (modge podge and regular Elmer’s glue work well too and dry clear).

Directions:

  • Wash and dry a glass jar
  • Cut out tissue paper designs
  • brush glue with a paint brush onto jar, place tissue paper on the glue spot and then brush glue on top of tissue paper so that it won’t tear off easy. Spread glue over each spot at the time you are ready to adhere the tissue paper.
  • Let it dry
Leo’s handmade February Calendar with a heart mandala design

Bake a special treat, set the table for your Valentine’s Tea Party, put a candle in your Heart jar, gather round the table and share in some Love, Laughter, Valentine’s and Chocolate Enjoy!

From our Family to Yours, Sending you all a day full of Friendship and Love


Adriana, Garden, Projects

Rhubarb Leaf Birdbath for the Garden

Years ago I saw this idea in a gardening magazine and loved it! It is simple to make and such a beautiful addition to the garden landscape. All you need is a giant Rhubarb leaf (you can really do this with a leaf of any size so feel free to get creative – Elephant Ear also works great too), a bag of cement, a bag of sand and a tarp or something to protect your cement from the elements while drying.

Instructions:

  • Make a mound of sand in an area that will not be disturbed as it will be the base for your leaf to dry.
  • Place Rhubarb leaf face side down on the mound of sand
  • Mix cement and apply to bottom side of leaf
  • Cover with tarp and let dry
  • Once cement is fully dry – flip it over and peel off the green leaf – Now your leaf is ready to place in the garden!

Get creative and try out some different leaves of all shapes and sizes. We have also used smaller leaves and used them outdoors and in our house. We’ve also tried adding powdered tempera paint to the cement mixture to give a color to it. You could also water color the cement when dry and use a sealant to keep the color from washing away. The finished product is a lovely addition to any garden space and the birds love it!

Wishing you a Creative Day in the garden – Making some Lovely Garden Art!

Adriana, Home School, Projects

Digging Clay from the Earth: Messy fun for Everyone!

It’s like striking gold! One day in the yard Leo and Lily were digging and discovered clay – lot’s of it! We did a little research and found out our little New England town was once known for making bricks a long time ago. So, it’s no surprise that clay is naturally plentiful. It has been a wonderful discovery and the kids continue to take full advantage of it! They usually fill a gallon bucket and get to work making some unique and beautiful creations. For Mother’s Day, Leo made me about 10 pinch pots! Yes, 10, because we all know, you can never have enough pinch pots!

The kids sometimes mix the clay with sand or straw to give it more strength. There are so many fun things you can make with clay. Leo made his own bricks and we cooked them on high heat over the grill. They now surround his corn bed out in the garden.

Lily has also used the clay on her potter’s wheel and made some bowls. We usually let the clay air dry. It isn’t water safe and some pieces are more delicate than others, but surprisingly once hardened, the clay is quite durable.

Once dry, you can try painting your nature clay, but it is pretty dark and grainy, so the paint doesn’t always show up that great. We have found that if you mix a powdered tempura paint into the clay – it can hold the color nice.

Recently the kids were inspired by a video we watched about making your own primitive outdoor clay oven and went outside to give it a try! First they collected their clay. Then mixed it with some sand and hay and then stomped all over it mixing it with their feet! It reminded me of the I Love Lucy episode when she stomps on the grapes in Italy! Some good old-fashioned messy fun!

Next the kids gathered an old table and some bricks to form a base for their oven. They decided this would be a mini version of the real thing to test out the process. Then they piled on the sand to form an oven shape and covered it with wet strips of newspaper. After that dried, they piled on the clay. The final product – a little small to bake a loaf of bread, but Leo said we could at least toast a slice of bread in it!

I you’re interested in making your own outdoor clay oven, this youtube video from the Townsend family is great https://www.youtube.com/watch?v=i0foHjPVbP4 . The Townsends family site is also fantastic if you are interested in exploring anything from the 18th and early 19th century with your kids or for your own personal interest. Here’s a link to their site https://www.townsends.us. My kids love watching these informational videos and it has inspired us to make many new creations from the early settlers. Especially appropriate in our slower pace, down time at home!

If you’d like to try digging up some of your own clay from the earth, searching near the banks of local creeks is one place that often has lots of clay. You could also research local clay in your area online. We also love working with store bought air dry clay.

If your kids are really young, you may find play-dough a better medium to sink their hands into. Although, my one year old very much enjoyed covering herself in clay and helping pat it down onto the clay oven- we just had to keep her from removing the clay and taking the oven apart!

This is a favorite and full proof play-dough recipe we have made over the years and like it the best because it’s easy to make and lasts long.

Homemade Playdough:

Ingredients:

  • 1 Cup Flour
  • 1/2 Cup Salt
  • 1 Cup Water
  • 1 Tablespoon Vegetable Oil
  • 2 Teaspoons Cream of Tarter

Mix all ingredients together in a medium size pan. Cook over low heat on stove top, mixing with a wooden spoon the entire time, until a ball forms. If you’d like to add food coloring, do this once play-dough has cooled a bit and mix into dough with your hands. Store the play-dough in and airtight container for a month. If it starts to get sticky, put it back in a pan on low heat to dry it out a little more.

  Have Fun!

*Since having kids, my motto has not only become “Embrace the Pace,” But Also – “Embrace the Mess!” It keeps them busy, it’s therapeutic and it makes for great memories!